


Room Visualiser
Try our floors in your home
0
0
It is vital that your room measurements are as accurate as possible as this will ultimately determine how much material you require. While measuring your space is mostly straightforward, it can feel tricky if the room has an unusual shape or size. That’s why we’ve created a simple guide to help you measure accurately.
Measuring Tape (Required) – To measure length and width of the room
Pen & Paper (Required) – To make a note of the measurements
Laser Pointer (Optional) – Good for larger spaces to measure quickly and accurately
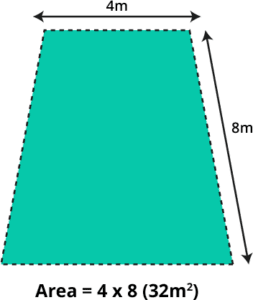
Measuring square and rectangular rooms are very straightforward as they simply require a simple measurement of the length and width
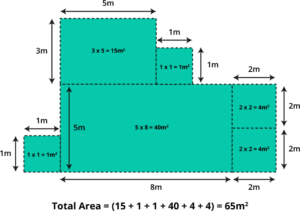
For rooms which are perhaps a bit more complicated or irregularly shaped, we recommend dividing the room in to as many square/ rectangular sections as needed. From there you can find the area of each section by multiplying the length and width. Finally, add the areas of each section together to find the total area needed.
If your room is U-Shaped, we recommend splitting it into three sections. Measure the length and width of each room, multiply them together, then add the areas of all three sections together to get the total area of your U-Shaped room.

If you don’t want to move the items from the room before measuring then it is important to take in to account the space occupied by these objects. Measure the depth (length) followed by the width of the object and multiply these together to get the total area occupied by the object.
With regards to measuring, there are slightly different procedures you must add/ follow to ensure that you achieve the most accurate measurement possible for your room.
Hardwood & Laminate Flooring (allowance for expansion gaps) – As Hardwood Flooring & Laminate Flooring is prone to expansion and contraction due to temperature change, it is important to allow for expansion gaps
Tile Flooring (considering grout lines) – Tile Flooring will involve grout lines in between each tile as they are not normally placed adjacently.
Carpet Flooring (measuring wall-to-wall) – Carpets are installed from edge to edge so it is important to not leave any gaps when measuring your room
Vinyl Flooring (accounting for roll width) – It is vital to ensure you order luxury Vinyl flooring with enough or even extra width to account for the width of your room
When measuring your room, it can be easy to make mistakes, especially if you haven’t done so before. Here are some common mistakes to be aware of when measuring your room so you can avoid them.
How do I measure a room with an irregular shape? – Divide the room into as many sections as needed then multiply the length and width of each section to find its area. Finally, add the areas of all the sections together to get the total measurement of the room.
How much extra flooring should I buy? – You need at least an extra 5% on top of the total area to account for wastage
What’s the easiest way to measure a large room? – Using a laser pointer can help immensely with measuring larger rooms
Should I include doorways when measuring for flooring? – Yes, it is very important to include doorways when measuring for flooring
How do I calculate flooring for multiple rooms? – To calculate the flooring needed for multiple rooms, multiply the length and width of each room to get the total area
In conclusion, it is very important to measure your room as accurately as possible to ensure that you purchase the correct amount of material and give you a greater peace of mind when installing your flooring.
Flooring for Smaller Rooms – Herringbone, Chevron, Light Flooring
Flooring for Large Rooms – Engineered, LVT, Laminate
Flooring for Square or Rectangular Rooms – Carpet, Engineered, Hardwood
Flooring for Irregularly Shaped Rooms – Wide Plank Flooring, Carpet, Large Format Tiles
Flooring for U-Shaped Rooms – Wide Plank Flooring, Laminate, Hardwood
Still unsure about your room measurements? No problem, contact us or visit one of our stores to speak with our flooring experts and claim your free home consultation today
https://www.flooringsurgeons.co.uk/contact-us/
Halesowen
214A Dudley Road. Halesowen, Birmingham, B63 3NJ
0121 274 8575
Monday – Friday: 9AM – 6PM | Weekends: 10AM – 4PM
Wolverhampton
317 Penn Rd, Wolverhampton, West Midlands, WV4 5QF
01902 836666
Monday – Friday: 9AM – 6PM | Sat: 10AM – 4PM | Sun: Closed
info@flooringsurgeons.co.uk
fitting@flooringsurgeons.co.uk
customerservices@flooringsurgeons.co.uk
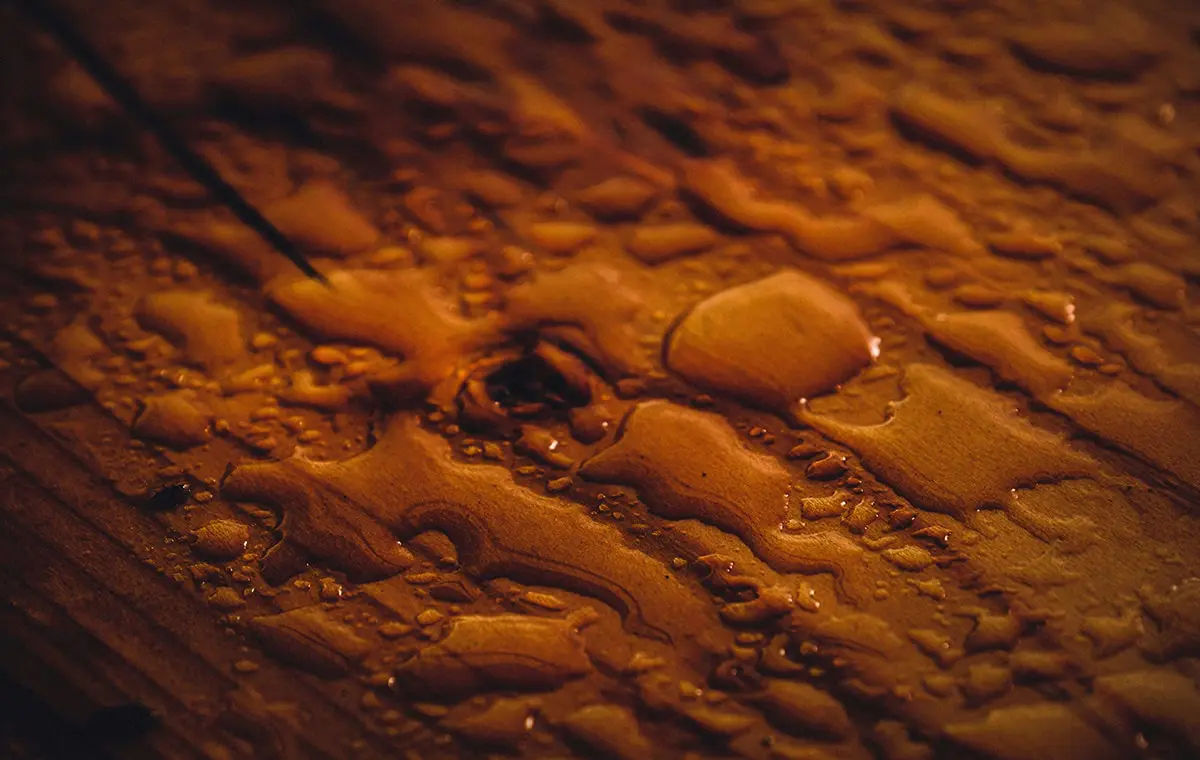
Wood is one of the most popular flooring choices across the UK, offering timeless charm and elegance—but it’s also highly vulnerable to moisture. Suppose moisture and water are not correctly removed from your hardwood flooring. In that case, it will lead to warping, unsightly and stubborn stains and mould growth, resulting in costly repairs. At Flooring Surgeons, we understand the stress of water stains, especially when you don’t know how to fix them. But don’t worry; we’re here to guide you through how to remove water stains from wood floors. This guide is for you if you want to keep your hardwood floors in top condition for years to come.
Identifying the type of water stain that has formed on your flooring is the first step to knowing how to remove water stains from wood floors properly.
Light water stains are usually easy to remove as they only affect the surface level of the wood. These stains typically appear as light or cloudy marks on the floor. A typical example is a glass placed directly on a wooden table, leaving a water ring. Light stains are often caused by condensation from an air conditioning unit.
Unlike light stains, dark water stains indicate a more serious moisture issue. On solid hardwood, this can mean that water has soaked into the wood grain itself, causing long-lasting stains. Dark stains on engineered wood suggest moisture has penetrated the top veneer layer and may have reached the plywood beneath. Dark stains usually require sanding and refinishing to remove them and restore the appearance of your wood floors.
Other Signs of Water Damage
• A musty smell
• Hardwood floor buckling
• Lifting nails and floorboards
• Mould growth
You will need the following materials to remove water stains from wood floors safely:
There are several DIY methods to remove water stains from wood floors, but first, you need to follow these steps:
Using a hair dryer can effectively remove white water stains caused by moisture. Set the hairdryer to its lowest setting and move it back and forth over the stain until it fades.
Mix a teaspoon of baking soda or table salt with a few drops of water. It should be thick enough to coat the stain and wet enough to penetrate the wood flooring underneath. Apply the paste to the stain using a cloth and gently rub in circular motions. Leave it for 24 hours before wiping it clean. This method can also be effective for removing wine stains.
A mixture of equal amounts of vinegar and olive oil can help the stain disappear. The vinegar helps lift the stain, while the olive oil is a natural furniture polish.
Apply the mixture to the water stain using a clean cloth. Finish by wiping the area with a dry towel to remove any excess residue.
If you have laminate flooring, read this: How to Clean Laminate Flooring
You can use commercial, shop-bought wood stain removers explicitly designed for your type of flooring. Alternatively, you can re-sand your floorboards to completely remove stubborn water stains. Never sand hardwood floors until dry, as premature sanding can cause crowning.
Also check this page for more cleaning: Tips to clean engineered wood floors

Preventive measures are always more cost-effective than repairing or replacing your floors. It’s best to remember a few tips to protect your floors.
If the moisture level is so high that your wooden floors are warped and need to be replaced, it is best to seek professional help. However, allow the floor to dry for at least a week before consulting.
Professional repair services using specialised tools and techniques ensure effective repairs, save time and ensure high-quality results. Our experts at Floor Surgeons offer cost-effective solutions for repairing damaged floors.
Acting quickly when a spill occurs can prevent lasting damage to wooden floors. Choosing the right wood, applying a protective finish, and stabilising indoor humidity levels can also reduce the risk of stains and spills.
Hardwoods like oak and maple are naturally more resistant to stains than softwoods like pine and cedar. Glossy finishes also tend to offer better stain resistance compared to matte ones.
Regular maintenance, like vacuuming and occasional damp mopping, helps keep wooden floors looking their best and prevents stains.
If your floors require professional care, consulting an expert ensures they remain in top condition for years.
For any flooring queries, drop us an email at info@flooringsurgeons.co.uk – or Visit our showrooms located in Birmingham & Wolverhampton!
Halesowen
214A Dudley Road. Halesowen, Birmingham, B63 3NJ
0121 274 8575
Monday – Friday: 9 AM – 6 PM | Weekends: 10 AM – 4 PM
Wolverhampton
317 Penn Rd, Wolverhampton, West Midlands, WV4 5QF
01902 836666
Monday – Friday: 9 AM – 6 PM | Sat: 10 AM – 4 PM | Sun: Closed
info@flooringsurgeons.co.uk
fitting@flooringsurgeons.co.uk
customerservices@flooringsurgeons.co.uk
Correct fitting of your flooring is essential in guaranteeing the best durability and look. While some may prefer to install the flooring themselves, many others do not possess the knowledge or skills to be able to install it. This is where professional fitters come in to play to fit the flooring for you ensuring the perfect durability and aesthetics. However, within the UK, Flooring Installation Costs can vary between fitters/fitting companies due to a number of factors such as flooring costs and labour costs.


